Want cheekbones that could cut glass? You’re in the right place.
Welcome, beauties! Today, we'll explore the fascinating world of contouring, a makeup technique that has gained immense popularity for its transformative effects on facial features. Whether you're a makeup enthusiast or a beginner, mastering the art of contouring based on your unique face shape can make all the difference in achieving a flawless and sculpted look.
Contouring has long been the secret weapon in a glam arsenal—and for good reason. When done right, it can subtly sculpt, lift, and enhance your natural features like magic. But here’s the real game-changer: learning how to contour different face shapes. Because when your contour placement is tailored to your unique facial structure, the results go from “nice” to next-level flawless.
Whether you're just contour-curious or already serving full glam, this guide is for you. We’ll walk you through contouring according to face shape, offer tips on where to put contour for the most definition, and help you dodge the most common mistakes along the way.
Now, let's delve into how contouring can truly transform your look, bringing out your best features with precision and artistry.
KEY TAKEAWAYS
- ⚡ Contouring is about enhancing, not hiding, your natural features: Every face shape benefits from a different contour placement that brings balance and harmony to your facial structure without changing your appearance.
- ⚡ Match your contour technique to your face shape:
- Round face: Add structure with definition along the cheekbones and jawline to elongate the face.
- Square face: Soften strong jawlines and temples for a balanced, feminine look.
- Heart-shaped face: Reduce forehead width and add fullness around the jawline for symmetry.
- Oval face: Contour lightly around the cheekbones and forehead for subtle sculpting.
- Diamond face: Soften cheekbones and highlight the forehead and chin for even proportion.
- ⚡ Master key contour areas for definition:
- Cheekbones: Apply contour just beneath your natural bone and blend upward for a lifted appearance.
- Jawline: Sweep product along the jawbone and blend into the neck for seamless shadowing.
- Nose: Lightly shade the sides of the bridge and add a small highlight on the tip for a refined effect.
- ⚡ Avoid common contouring mistakes:
- Don’t over-blend—retain some structure and depth for visible definition.
- Use minimal product; build gradually to prevent a heavy or “muddy” look.
- Select cool-toned shades that mimic natural shadows rather than overly warm tones.
- Invest in proper tools—angled brushes or a damp sponge deliver seamless blending.
- ⚡ Precision and subtlety yield the best results:
- Always contour in natural lighting for accuracy.
- Start light and layer slowly.
- Stick to shadow-like tones for realistic depth.
- ⚡ Experiment with creative contouring styles: Makeup is an art form—try techniques like blush draping, graphic lines, or combining matte and shimmer finishes for unique results that express your style.
- ⚡ Use quality tools for pro-level finishes:
- Angled contour brushes for precision.
- Fan brushes for soft, diffused highlight.
- Damp beauty sponges for blending seamlessly into skin.
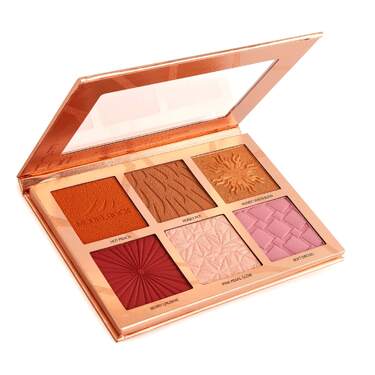
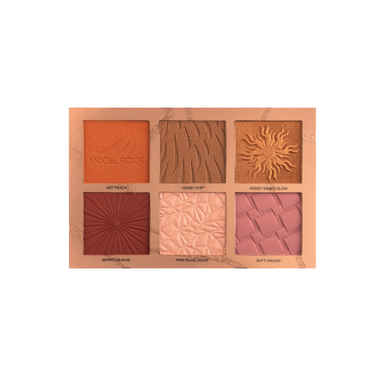
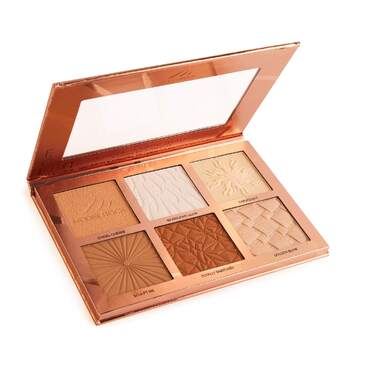
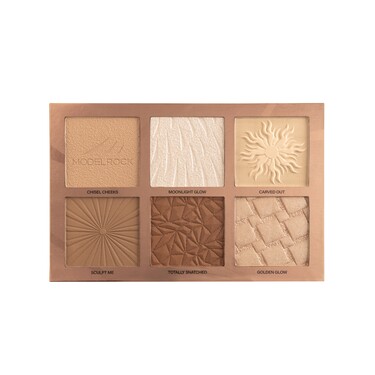
- ⚡ MODELROCK essentials for sculpting: The CHISEL-SCULPT-SHADE Palette provides versatile contour tones for all skin types, while the HOT & SNATCHED Face Palette delivers dramatic, editorial finishes for advanced looks.
- ⚡ Final thought: Contouring isn’t about perfection—it’s about practice, patience, and personality. Start simple, refine your technique, and let your confidence be your ultimate contour.
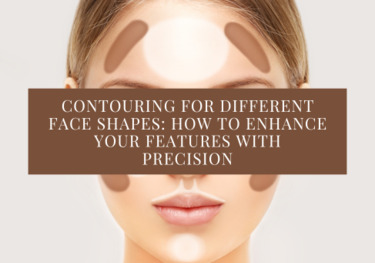
THE SIGNIFICANCE OF CONTOURING FOR DIFFERENT FACE SHAPES
No two faces are the same, so why should contouring be? A round face needs a different strategy than a heart-shaped or square face, and understanding your face shape helps you enhance—not hide—your features.
Contouring according to face shape is all about balance and harmony. It’s not about changing your face, but about working with what you’ve got and celebrating your bone structure.
Here’s how smart contour placement can work magic:
- Round face → Add structure with angular definition on the cheekbones and jaw
- Square face → Soften sharper edges and balance the forehead and jaw
- Heart-shaped face → Minimise the width of the forehead and add fullness to the lower half
- Oval face → Define cheekbones and forehead subtly without changing proportions
The goal? Let your natural beauty shine—with a little sculpted help.
.png)
WHERE TO PUT CONTOUR: CHEEKBONES, JAWLINE & NOSE
If you're wondering where to put contour, you're not alone. Here's a quick breakdown of contour placement for your key features:
Cheekbones
- Apply contour just below your natural cheekbone
- Blend upward toward the temples for a lifted effect
- Keep it subtle and seamless—think shadow, not stripe
Jawline
- Sweep contour along the jawbone
- Blend down into the neck for a natural transition
- Focus on sculpting the edges without creating harsh lines
Nose
- Lightly contour the sides of the bridge to slim
- Add a touch at the tip for a lifted appearance
- Use a small brush for precision and avoid overdoing it
Pro tip: Reach for MODELROCK’s CHISEL-SCULPT-SHADE palette—its versatile shades make custom contouring a breeze, no matter your skin tone or feature focus.
IDENTIFYING, CONTOURING & HIGHLIGHTING FOR DIFFERENT FACE SHAPES
Before you pick up your brush, figure out your face shape—it’s the foundation for smart contouring. Not sure where to begin? Our blog [How to Contour Your Face] breaks it down with diagrams and detailed tips.
Here’s a quick reference:
- Round: Contour the sides of your forehead, under cheekbones, and along the jawline to create dimension
- Square: Soften the jaw and temples; focus contour on outer edges of the face
- Oval: Light contour under cheekbones and temples for subtle sculpting
- Heart: Contour around the forehead and temples; add balance with jaw contour
- Diamond: Soften cheekbones slightly; highlight forehead and chin for symmetry
.png)
This isn’t about altering your appearance—it’s about spotlighting the beauty that’s already there. So whether you're learning how to contour different face shapes or just experimenting, have fun with it.
COMMON CONTOURING MISTAKES TO AVOID
Even the best products can fall flat with the wrong technique. Let’s break down the top mistakes—and how to avoid them.
- “Over-blending? More like blending into oblivion.”
Blending is crucial, but too much can erase all your hard work. Blend just enough to soften edges while keeping shape definition.
- “Too much product = too much drama.”
Over-contouring can make your makeup look muddy or mask-like. Start with less and build slowly.
- “The wrong shade throws the whole look off.”
Pick a cool-toned shade close to a natural shadow—not too warm, not too dark. MODELROCK’s curated face palettes take out the guesswork.
- “Patchy or unblended? That’s a no.”
Poor blending tools lead to poor results. Use a soft blending brush or damp beauty sponge—MODELROCK’s tool range has you covered.
Final tip: Think snatched, not smudged.
.png)
TIPS FOR PRECISION CONTOURING
For next-level results, precision is everything. Here’s your quick checklist:
✅ Use a tapered or angled contour brush
✅ Blend in natural lighting whenever possible
✅ Stick with cool-toned contour shades for a shadow-like effect
✅ Always start subtle—you can build up, but it’s harder to dial back
MODELROCK’s HOT & SNATCHED Face Palette is perfect when you’re going for a more dramatic, editorial finish.
.png)
CUSTOMISING CONTOURING FOR PERSONAL PREFERENCES
Rules? What rules? While traditional contouring is great, don’t be afraid to get creative.
Try blush draping, graphic contour lines, or even coloured contouring for high-fashion, editorial vibes. The beauty of makeup is in its versatility—contour "rules" are more like suggestions.
Mix cool and warm tones. Play with matte and shimmer finishes. MODELROCK’s variety of palettes lets you create totally custom looks with ease.
Makeup is self-expression—so let your creativity lead the way.
.png)
CONTOUR AND HIGHLIGHT TOOLS THAT MAKE A DIFFERENCE
Tools matter. The right brush or sponge can make your contour look pro-level, even if you’re a beginner.
Top tool picks:
- Small angled contour brush for cheek and jaw precision
- Fan brush for light, diffused highlighting
- Damp beauty sponge for melting product into skin seamlessly
Try MODELROCK’s expertly designed vegan brushes to level up your contouring game. And remember: your tools don’t need to be fancy—they just need to work for you.
CONCLUSION
Contouring isn’t a talent—it’s a skill. And like any skill, it gets better with practice. Be patient with yourself and start small. One technique at a time is all it takes to start seeing snatched results.
And above all else—confidence is your best contour. So wear it boldly.
Explore MODELROCK’s makeup essentials and discover the products that help you sculpt like a pro.